There are large numbers of users who use the Facebook Messenger app to chat and do video and voice call with friends, family, and other people.
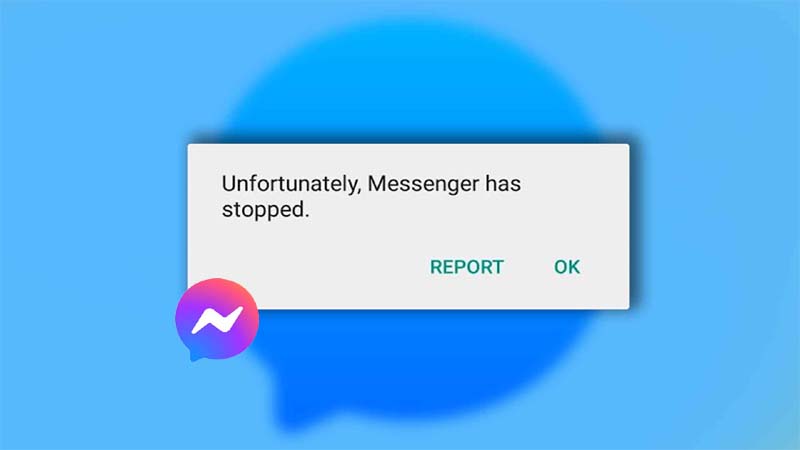
However, there are some users who are reporting that they are receiving the error message “Unfortunately, Messenger has stopped” while using the Messenger app. I know this is a very irritating issue that every user wants to fix as soon as possible.
So, simply read this guide to learn why this error occurs and how to fix “Unfortunately, Messenger has stopped” error on Android.
We will first talk about the reasons and then we will move to the effective methods to get rid of this error message from your device.
Reasons: Why You Get “Unfortunately, Messenger Has Stopped” Error on Android?
Well, there is no exact reason that can lead to the error ‘Unfortunately, Messenger has stopped’ on Android tablets or phones. Hence, we have listed some possible causes behind this error. They are as follows:
- If the Messenger app and your smartphone are running on the older version.
- When the Messenger app server is down.
- A corrupted cache file can also cause this issue.
- If the storage space of your phone is full then the apps may crash or misbehave.
- When the internet connection is unstable.
- When there are so many messages and media files saved on the Messenger app.
These are some of the possible causes for the occurrence of this error. So, without wasting time, let’s jump to the solutions to fix it.
Related Read: Fix “Unfortunately, Google Play Services Has Stopped” On Android
How To Fix “Unfortunately, Messenger Has Stopped” Error on Android?
Now, we will try to fix this issue by using the below-listed methods. So, just start following the solution one after another to check which one will solve this problem.
Method 1: Restart Android Device & App
If you have not switched off your smartphone for a long time then the apps may crash or not work properly.
Hence, you should first restart your device. For this, you need to just press and hold the Power button until you see the Power menu on your phone’s screen. Then, simply tap on the Restart option and let your device power off and on again.
If this doesn’t work then just open the multitasking menu and close the Messenger app and then open it again to see if it is working fine.
Method 2: Install Update for Messenger App
Sometimes your Facebook Messenger app stops working if it is running on an older version.
Hence, you should check the update for the Messenger app. For this, open the Google Play Store on your handset and then enter the name of the app in the search box. Next, tap on Update button next to the Messages app to install the latest update.
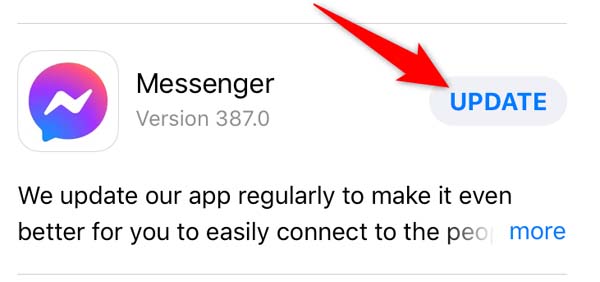
If you get the Open button in place of Update then it indicates that your Messenger app is up to date.
Method 3: Force Stop Messenger App
If Messenger keeps stopping on Android smartphone then you can force close the app to resolve it.
To do this follow the below steps:
- Open the Settings app.
- Scroll down and tap on Apps.
- Choose the Messenger app from there.
- Next, tap on Force Stop.
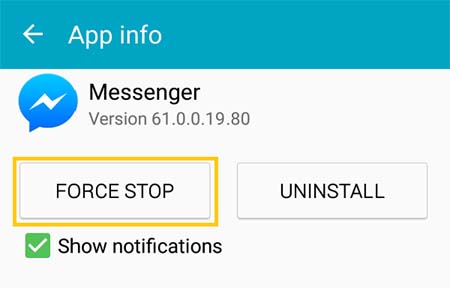
After this, close the Settings app then open the Facebook Messenger application again to see if is working fine or not.
Related Read: Fix Messages “Not Sent” Or “Delivered” On Truecaller
Method 4: Check Status Of Messenger App
You should also check the status of the FB Messenger app because sometimes the server goes down and due to this the Messenger app won’t work.
To confirm if the server is down or not, launch the Downdetector website and check for the Facebook messenger app’s graph. If it is down then wait until the graph gets up.
But if it is not down then move to the next solution.
Method 5: Check Internet Connection
A good internet connection is necessary to chat on Messenger. And if the internet connection is not stable then the Messenger app will not work properly and start crashing or showing you the error message.
Hence, you need to make sure that the internet connection that you are using is stable. If Messenger is not working on mobile data then you can switch to Wi-Fi.
Method 6: Clear Messenger App Cache And Data
Clearing the cache and data of the app can also help you to fix Messenger keep stopping. So, you should also try this fix.
Here are the steps that you need to follow for clearing the cache and data of the Messenger app:
- Open the Settings application on your Android device.
- Scroll down and tap on Apps/Apps & notifications.
- Then look for Messenger in the list of all apps.
- Hit on the app and then tap on Storage
- Next, tap on Clear data and then on Clear cache.
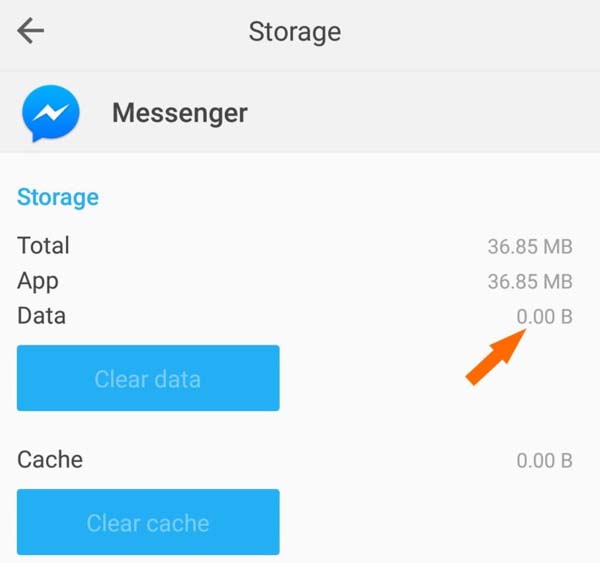
If this also doesn’t work then log out from it and then again login to it.
Method 7: Update Android Device
You need to check that your Android phone or tablet is updated to the latest version. Because this can also cause this error prompt.
Hence, you should look for the update and install it if the latest one is available there.
Below are the steps that you need to follow for this:
Step 1: Go to Settings > System.
Step 2: Then hit on check for update under Updates.
Step 3: Now, wait till it checks the latest update.
Step 4: If it shows the update then just download it.
Related Read: [Solved] YouTube Vanced “The Following Content is Not Available On This App”
Method 8: Allow Necessary Permissions
While installing any app on your phone, it asks for some permissions to access functions such as contacts, location, camera, etc.
When you don’t grant these permissions then the app can create problems.
If you have done this with the Messenger app then it can send you the error message Unfortunately, Messenger has stopped.
So, to allow these permissions on the Messenger app, you need to follow the below-listed steps:
- From the home screen, press and hold the Messenger app icon for few seconds till it shows the App Info option, tap on it.
- If it doesn’t show this option then go to Settings > Apps > Messenger.
- Next, select “App Permission” menu.
- Go to All Permissions and select Allow or Allow while using the app.
Method 9: Clear Storage Of Your Phone
If there is not enough storage on your device then this can be the major reason behind the error message ‘Unfortunately, Facebook Messenger has stooped’.
Therefore, we suggest checking the storage of your phone. And if you find the storage space full then clear some storage by deleting unwanted data and apps.
Once you remove the unnecessary data restart your device and then check if it is still sending the popup error while opening the Messenger app.
Method 10: Leave Messenger Beta Program
If you belong to that type of user who is using the Messenger beta program to test the features that are not announced then you may get this error.
To solve it, you need to leave the beta program. Below, learn how to do this.
- Open the Google Play Store.
- Next, input the name of the app in the search bar and go to the app page. Just scroll down a bit and you will find an option to leave it.

- Uninstall the Messenger app.
- Then again install the latest one from Play Store.
Method 11: Close The Running Apps
If there are so many apps running in the background of your phone then it can affect other apps like Messenger.
So, to get your Messenger back to normal you need to close all the running apps from the background.
For this, just open the multitasking menu and then close all the other apps except Facebook Messenger.
Related Read: CBErrors Error 0 In Coinbase? Here Is The Real Fix!
Method 12: Reinstall FB Messenger App
If Messenger is not working today on your phone then you can do a small task which is to uninstall the app and again install it from the Google Play store.
Note: Remember that when you will uninstall the Messenger app from your device then it will erase all the videos, pictures, GIFs, etc. Hence, you should take a backup of these files before uninstalling the app.
Now, follow the below-mentioned steps to do the same:
- Navigate to Settings > Apps.
- Look for the Messenger app and open it.
- There you will see the Uninstall button, tap on it.
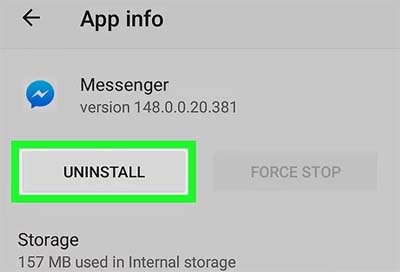
- After doing this, open Google Play Store app.
- Type the name of the app in the search bar.
- Lastly, hit on the Install button next to the app to reinstall it.
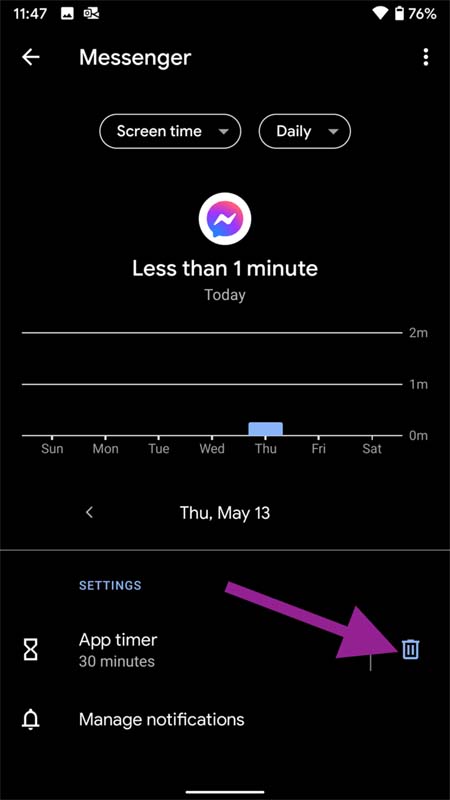
Method 13: Eliminate Messenger From Digital Wellbeing
Messenger is an addictive app and due to this if you have set the time limit for Messenger app usage via Digital Wellbeing app then once the time limit gets completed, you will see a grey app icon and can’t use it.
To solve it, you need to exclude it from there. For doing this, follow the below-listed steps:
- Navigate to Settings.
- Find Digital Wellbeing & parental controls.
- Hit on the usage graph.
- Scroll down to look for the Messenger app’s time limit.
- Hit on it and choose delete from the following menu.
Method 14: Try Messenger Lite
If you have a phone which has a low RAM then you should try Messenger Lite app as it is a lighter version app.
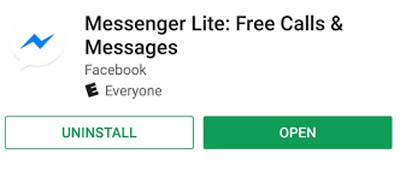
Though it doesn’t provide all the features as Facebook Messenger app but it is a good alternative app.
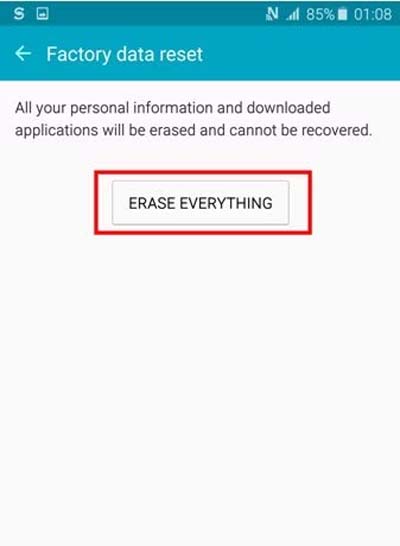
Method 15: Factory Reset Your Device
If you don’t want to use Messenger Lite then the last option left for you is to factory reset your device.
This will fix the issue but on the other hand, you will lose all the files, apps, and all settings.
If you don’t want to lose it then you must create a backup before doing a factory reset.
Here are the steps that you need to follow to reset your device (I am using a Samsung phone)
- Tap on the Settings app icon.
- Scroll down to Backup and reset
- Hit on Factory data reset.
- Now, tap on Reset device > ERASE EVERYTHING.
Note: All the above-stated methods will be applicable for any Android phone or tablet like Samsung, Xiaomi, Oppo, OnePlus, Vivo, Huawei, Google Pixel, Realme, Lenovo, Asus, Sony, Moto, HTC, etc.
Sum Up
I hope after trying these methods you will be able to fix “Unfortunately, Messenger has stopped” error on Android.
All the above-listed methods are very easy and effective and surely help you in coming out of this problem.
If you found this article helpful then you can share it with your friends or family who are still going through this error.